For as long as people love photos, photo effects will never get old. People may develop new layouts and the designs may change, but photo effects will remain as they are. They add zing to your snaps and pictures. So if you’re looking to spice up your images, you’ll love these cool Photoshop effects for your photos.
Do you love to put cool Photoshop effects on your images? Isn’t it amazing that, with these visual effects, you are able to transform a plain image into a stunning piece of art? What’s even more amazing is that it’s easy to create.
Yes, those cool Photoshop effects you thought were too difficult to create are actually easy to make. From watercolor effects to polaroid, from Instagram effects to vintage look, the photo magic of Photoshop will never go out of style.
If you have a superb tool such as Photoshop within your reach, take the best of it. Take snapshot, create images, and transform them into exquisite artwork. It’s what it’s for.
We’ve round up some of the best tutorials to come up with cool Photoshop effects for your photos. These tricks range from the simple wrinkle eraser to creating a hipster look for your images. What’s best about these tutorials is that they are easy to follow and quick to learn.
Are you ready to create your next masterpiece? Check out these treasures we found. Here are simple tips on how to create eye-catching, cool Photoshop effects that will bring out the Photoshop rock star in you. With the stunning art that you’ll create, da Vinci and the rest of the art masters would be proud!
Check out more cool photoshop click HERE.
Cool Photoshop Effects
From tilt-shift techniques to vintage visuals, we feature these cool Photoshop effects. Don’t skimp on your creativity. The possibilities are endless once you learn these amazing effects. So without further ado, here are the best visuals we’ve gathered. Follow through with these techniques and dig deep into your creative mind to create truly wonderful, stunning art.
Check out:
| The Importance of Choosing the Right Color Scheme for your Website |
| Design Trend: The Marble Texture is Back! |
| Commercial Websites: 8 Important Steps to Building a Killer Business Site |
Achieve the Nashville Filter Effect with Your Images
 Instagram has truly revolutionized social media. The photo-sharing platform features filter modes that allow users to create beautiful images with just a little touch. One of the various filter schemes in Instagram is the Nashville effect.
Considered an all-time favorite by many Instagram users, Nashville gives photos a nostalgic feel, which evokes deep emotions on the part of the viewer. It’s a power that this effect has in the eyes of the beholder. It places the viewer in
If you want to feature this gorgeous effect on your photo, here’s an easy-to-follow tutorial on how to create the Nashville feel. The process involves creating a new layer and filling it with varying levels of red, green, and blue color effects. With the blending option set to Multiply, opacity is dialed at 100 percent. Next step is a play of contrast and brightness. Contrast is at 51 while brightness at 6.
Give your image some curves, adjust the depth levels, and merge the layers. This cool Photoshop effect leaves the rest to your imagination and creativity. Take the time to experiment on the different concepts and apply various techniques. Play with them and enjoy this stunning filter effect.
Here’s the link to the tutorial for this cool Photoshop effect.
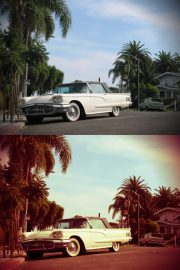
Give Your Photos a Timeless Feel with the Vintage Polaroid Effect
 Have you noticed how photos shot using cameras in the 70s and 80s (60s too!) give that evocative feel? Did you know you can recreate this vintage look even if you’re using present-day cameras (like the built-in cameras in your phone)? Here’s a step-by-step guide on how to give your images this cool Photoshop effect.
Introducing the gorgeous Vintage Polaroid effect. With just a few adjustments on the colors, contrast, and brightness levels, coupled with tweaks on the layers, you can give your photos an aged appearance and a sentimental feel.
The most prominent feature in images that given a Vintage Polaroid touch-up is its faded colors. To achieve a truly classic, aged look, this is best paired aged, smudged marks and distressed borders. Add some subtle coarse texture and various overlays and you get that old-time feel with your photos.
What you need to do is create little adjustments on the contrast level. Manipulate the curves, aiming for a slight inverted S-bend. Then get back to tweaking the colors, adjusting the tones in the blue and green channels, among others.
Once you’ve achieved the ideal color mixture, paint around the central figure in the image with red brush marks. Create subtle changes to the light by adjusting the blending mode to Screen, setting it at 40 percent. Work the saturation and add another layer.
Wondering how to get that distressed border around the photo? You can use brush stroke Photoshop brushes to give that old, aged Polaroid-style frame on the edge of the picture. As a final touch, put in the year the photo as supposedly taken. In the tutorial’s sample image, the phrase “Summer ‘68” was handwritten to give the vintage impression.
Would you like to learn how this cool Photoshop effect is done? Check it out here.
Get That Instagram-Inspired Visual Effect with Photoshop
 Did you know you can customize your pictures and give it that Instagram-inspired visual effect? Want to create gorgeous photos with a high-quality editing touch? Like the other cool Photoshop effects featured in this article, this one’s easy to make. All you need is Adobe Photoshop C5 for this awesome design.
Just like Nashville, the Earlybird filter is one of the popular cool Photoshop effects in Instagram. It’s a variation of the sepia visual effect with a touch of yellow photo effect. Add some soft blur and darker edges to create a dramatic vignetting characteristic.
The Earlybird effect is a play of lighting effects. You will need to manipulate the photo as if there’s a light source positioned directly above the picture. To get the Earlybird appearance, the light needs to be focused on the center with the side growing dimmer
If you want to learn how to create this gorgeous, Instagram-inspired photo, check out this easy-to-follow tutorial.
Add a Movie-Style Effect in Your Photos
 Here’s another good one. If you’re looking to add a dash of Hollywood in your photos, you’ll love this movie-style photo effect. In this tutorial, you’ll learn to retouch your photos and edit it to look like a movie poster.
To achieve a movie-style look and feel in your photos, let’s focus on adjusting the contrast levels to high while setting the color tones to predominantly blue. However, there may be some initial retouching of the photo before you begin making the color and contrast changes. Using the Spot Healing Brush, you need to remove all blemishes on skin. Also, aim to zap the pimples and smooth out the imperfections. But don’t go overboard with the blemish removal. Otherwise you’ll risk creating a somewhat creepy feel with your subject’s face.
Once you get the preparatory work done, proceed with the color and tone changes to the image. Start with by adjusting the contrast of the image by moving the black and white handles slightly inward to clip the shadows. This will highlight the contrast of the photo.
Next is to balance the color levels. Set the tones to cyan and blue while adding cool tones to the shadows. The blue hue gives the image a dramatic feel. In contrast to red and yellow, which is lets off a summer or vintage appearance.
After tweaking the color and tone levels, it’s time to adjust each layer’s opacity. Set the color balance to 70 percent while the levels at 50 percent.
For some finishing touches, you can work on making the eyes stand out from the rest of the elements in the photo. You can paint over the iris of the eyes with a color of your choosing. In this tutorial, the iris of both eyes were changed to blue green.
Want to see the tutorial for this cool Photoshop effect? Check it out here.
Turn Back the Hands of Time with the Retro Photo Effect
 Vintage is the rage nowadays. Virtually everyone wants to create a timeless, classic feel in their photos. Perhaps it’s the nostalgic evocation. Or the hint of wistfulness as one reminisces the times gone by. Just like the cool Photoshop effects such as Nashville and Earlybird filters.
Want to turn back the hands of time? Give your photos an aged feel with the Retro photo effect. You can do it in only 3 easy steps. To begin the process, use your Photoshop’s Curves adjuster to edit and alter the color of the photo. Why use an adjustment layer? It’s a nondestructive feature that you can simply remove at any time if you’re not happy with the effect produced.
In the Curves option, set it to the Red option and aim to increase the red in the color balance of the photo. Now go to the Blue option and drop the level of blue in the color balance. This will result in producing a predominantly yellow hue in the overall image.
Next step would be to proceed with the Green option, adjusting it to make the yellow hue prominent in the highlights while setting the red color mainly in the shadows. With some fine tuning of the colors and making appropriate changes on the curves, you can achieve a retro feel in your photos.
Want to give your images a retro look? Check out this tutorial to get this cool Photoshop effect.
Cool Watercolor Effect in Photoshop
 You can’t create a list of cool Photoshop effects without referencing the watercolor filter. If you love watercolors, you’ll definitely love this tutorial. Here’s a summary of what needs to be done to create his awesome filter.
Start by adding a new layer, filling it with white but reserving the black and white combo for the background and foreground hues. Add some texture to your image; this tutorial used parchment paper. Set the opacity to the image at 75 percent.
Move to add a photo over that image. But the photo needs to be set under the textured layer. Work on the editing changes further by using some Watercolor Brushes. Once done with the brushing, adjust the color to get the best of the cool visual effect.
To learn more about this artsy filter, check it out here.
Experimenting with the Lens Blur Filter
 Are you looking to experiment with the cool Photoshop effects on your computer? Have you tried to create a blurred effect in your photos? It’s pretty interesting and actually very easy to do. All you need to focus on is controlling the amount of depth. Want to know how this works? Follow this tutorial.
Start by looking at what to focus on and what to blur. In this tutorial, they featured cars lined up a traffic stop. Now switch over to the Quick Mask Mode. Using a soft brush, draw a line over your selected area to focus on. After making a few adjustments to the layers, you should be able to have a tilt-shift style blur. Also, this may give your image a micro-look scene, as what appears in this tutorial. Now bump the contrast levels and work on the layers.
Want to learn this cool Photoshop effect? Get to this link for the tutorial.
Give your Photos a Broken Glass Effect
 Here’s the last of the list of our selection of cool Photoshop effects. In this tutorial, you’ll learn how to create a visual effect that gives the impression that you’re looking through broken glass. It’s pretty realistic, we might add. And did we mention it’s quick and easy to do. Let’s learn this awesome filter together, shall we?
What you need here is to get the shattered glass brushes, which you can download from the tutorial’s website. To start, lower your image’s saturation level at -70 while setting the vibrance value at +15. You may add text to your photo—a nice detail which is also discussed in the tutorial. Now adjust the opacity and complement it with lens flare. You get a realistic feel of looking through broken glass.
Check out the tutorial to this cool Photoshop effect. Here’s the link.
Conclusion
Can’t get enough of these tutorials? Want to learn more cool Photoshop effects? Check out PSD Templates Blog for more tips on how to create stunning works of art.
Feel Free to comment with your suggestions and queries.
If you want to check out more content like this visit our website.